How to Use Custom Subfolder Naming in DriveUploader
DriveUploader now allows you to automatically create subfolders based on the values users enter in your custom upload form, such as name, email, project title, or any other custom input. This makes organizing files even easier and more personalized.
Part 1: Create a Custom Form to Collect User Data
Before setting up custom subfolder naming, you first need to create a custom form. If you haven’t done this yet, follow the steps below.
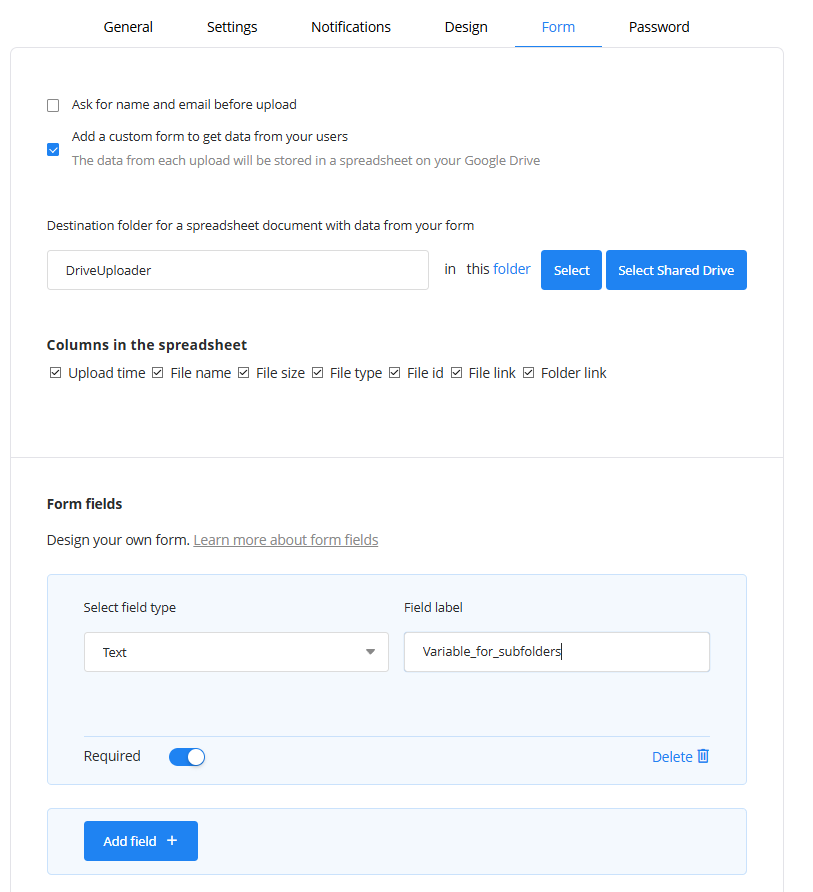
✅ Step 1: Create an Uploader with a Custom Form
To use subfolder naming based on user input, you'll first need to set up a form that collects the values you want to use for naming. For example, if you'd like to create folders named after the user's full name or project, you'll need fields like “Name” and “Project Title” in your form.
📘 Need help creating a form?
Follow our full step-by-step guide here:
Here’s a quick overview of the key steps:
- Go to your DriveUploader dashboard and create a new uploader.
- In the uploader settings, on Form tab, enable Add a custom form to get data from your users.
- Add custom fields you want users to fill out—like:
- Full Name
- Project Title
- Any other relevant data
- Save your uploader.
Once you have your form ready, you're set to move on to Part 2 of the tutorial, where we’ll show you how to use those form inputs to automatically name the subfolders where files will be stored.
Part 2: Enable Subfolder Creation and Customize Folder Names
Once you have created your custom form (see Part 1), you're ready to automatically organize uploads into subfolders using the values your users enter.
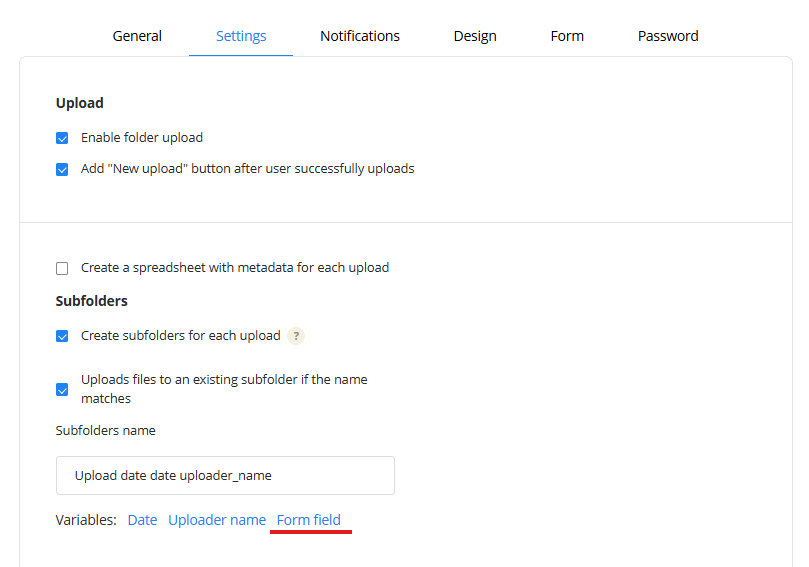
🛠 Step 2: Enable Subfolder Creation
- Open your DriveUploader dashboard and select the uploader you want to configure.
- Go to the Settings.
- Scroll down to the section “Subfolders”.
- Enable the option “Create a subfolder for each upload”.
This ensures that each upload will be placed in its own folder, which can be customized based on form inputs or other values.
🔁 Optional: Use Existing Folder if Name Matches
You’ll also see a checkbox labeled:
“Upload files to an existing subfolder if the name matches”
Enable this if you want repeated uploads (e.g. from the same customer) to be saved in the same folder — instead of creating a new one each time.
For example:
- You use Name as part of the folder name.
- If “John Smith” uploads multiple times, all his files will be stored in one folder named John Smith rather than creating a new folder every time.
🧩 Step 3: Customize the Subfolder Name with Variables
Next, you’ll see an input box to define how subfolders should be named.
You can type a static folder name (e.g., Customer_Uploads), or make it dynamic by using variables.
Available Variables:
-
🕒 Date
Inserts the current date and time of the upload.
Example: date → 2025-06-10 14-30-13 -
📂 Uploader Name
Uses the internal name of your uploader (not the form field).
Example: uploader_name → Q2_Campaign_Assets -
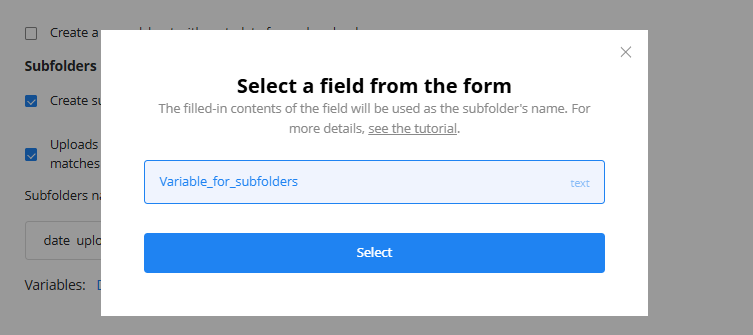
📋 Form Field Values
After selecting “Form Field”, you’ll see a list of all fields you added to your form
Choose one or more to include in the subfolder name.
Example: {Name}_{Project} → JohnSmith_NewLogoDesign
Then, you can select the variable from the form you created before.
You can mix static text and variables:
Customer_{Name}_Upload_date
This would generate subfolders like:
Customer_JohnSmith_Upload_2025-06-10 14-30-13
Once done, save your settings. Every future upload will now automatically go into its own subfolder — named exactly how you specified.
➡️ That’s it! Your uploader is now set up to keep files neatly organized based on custom form input.