How to integrate DriveUploader with your Wix website: A step-by-step guide
When managing a website, one of the most important features you might need is a way to collect files from users efficiently. Whether you're asking for documents, images, or videos, integrating an easy and secure file upload solution is essential. One of the best ways to achieve this is by using DriveUploader, a service that allows users to upload files directly to your Google Drive.
Why use DriveUploader with Wix?
Integrating DriveUploader with Wix offers several benefits:
- Streamlined file collection: Easily receive files directly into your Google Drive without requiring manual transfers.
- User-friendly interface: Provide a simple and professional file upload experience for your website visitors.
- Customizable uploads: Control file size, types, and other parameters to ensure you receive exactly what you need.
- Secure and private: Files are uploaded directly to your Google Drive without exposing your account to users.
Let’s dive into the step-by-step process to embed DriveUploader into your Wix website.
Step 1: Create a DriveUploader upload page
-
Sign Up or Log In
- Visit DriveUploader.com.
- Create an account or log in if you already have one.
-
Set up an uploader
- Click on “Create”
- Customize the Uploader by:
- Naming your uploader.
- Setting allowed file types (e.g., PDF, images, videos).
- Specifying file size limit.
- Adding optional fields for users to provide additional details (e.g., name, email).
-
Generate the Embed Code
- Once your upload page is ready, navigate to the “Embed” options.
- Copy the embed code provided by DriveUploader.
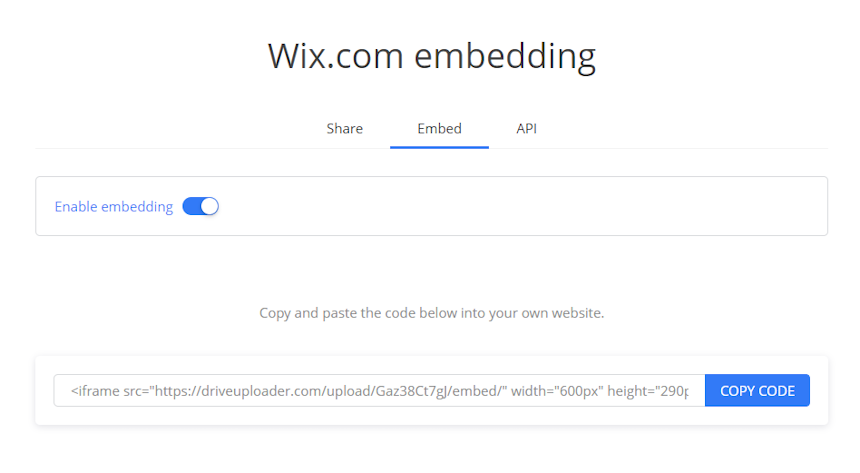
NOTE: Do not forget to enable embedding by using the button above.
Step 2: Log In to your Wix account
-
Access your website
- Log in to your Wix account and open the website editor for the site where you want to add the upload functionality.
-
Navigate to the desired page
- Choose the page where you want the upload box to appear (e.g., Contact Us, Submissions, or a dedicated Uploads page).
Step 3: Embed DriveUploader into your Wix website
-
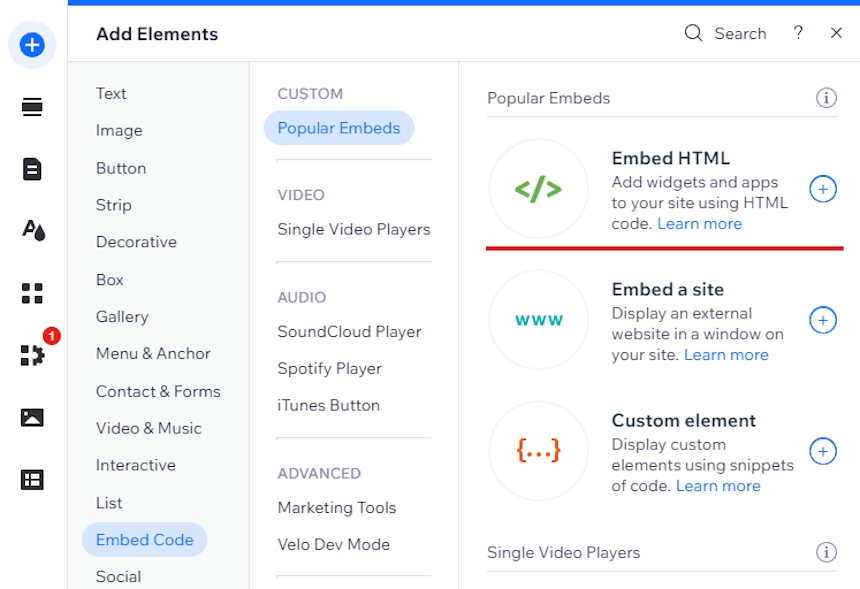
Add an embed element
- In the Wix editor, click the “Add” (+) button on the left-hand menu.
- Select “Embed Code” and then “Embed HTML.”
-
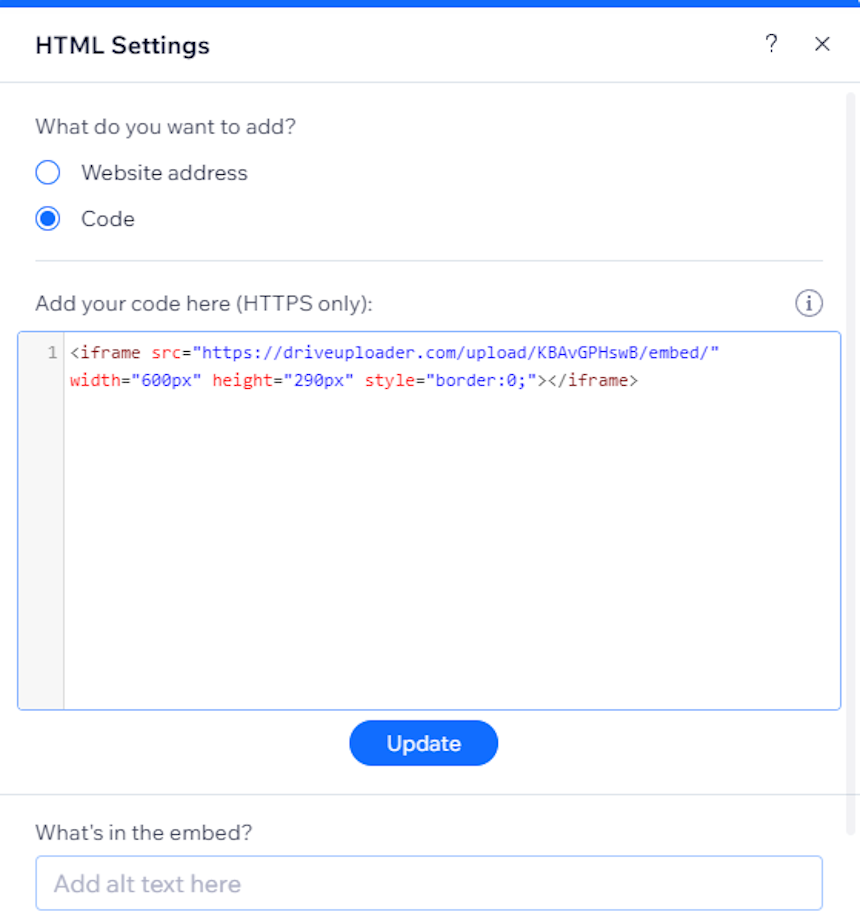
Paste the Embed Code
- In the HTML settings window, paste the embed code you copied from DriveUploader.
- Adjust the dimensions of the embed box to ensure it fits well within your page design.
-
Position the upload box
- Drag and position the embed element to your desired location on the page.
- Test the layout to make sure it aligns with your site’s design.
Step 4: Test the integration
-
Preview your site
- Use the Wix preview mode to test the upload box.
- Upload a test file to confirm that the file is correctly sent to your Google Drive.
-
Go live
- If everything works as expected, publish your site to make the upload functionality available to visitors.
Step 5: Optimize the experience (Optional)
- Customize styling: Adjust the colors, fonts, and layout of the surrounding elements in Wix to make the upload box blend seamlessly with your website design.
- Add instructions: Include clear instructions or a short description above the upload box to guide users.
- Set up notifications: Use DriveUploader’s settings to enable email notifications whenever a file is uploaded.
Conclusion
By embedding DriveUploader into your Wix website, you can offer a seamless and professional file upload experience that integrates directly with your Google Drive. This simple yet powerful solution is ideal for businesses, educators, creatives, and anyone who needs an efficient way to collect files from their website visitors. Try it out today and see how it can enhance your workflow!