How to create an uploader
Creating an uploader is a basic and key function of DriveUploader. It is very simple and fast.
Before you begin
You must be loggedin to your DriveUploader account in order to create an uploader. Please note that it is only possible to use Google Drive of the same account as the destination for the uploaded files.
Step 1: Create an uploader
After logging in to your account go to My uploaders page and click on CREATE button.

Step 2: Set general parameters

Title - Select the label of the uploader, which will be displayed in the list of uploaders and also above the upload window itself.
Description - Set up more detailed uploader descriptions that you can use to give users additional information, such as what files to upload. This feature is only available for PLUS or PRO plans.
Destination folder - Use the SELECT button to select the folder to which you want to upload files from the form you are currently creating. The SELECT SHARED DRIVE button also allows you to select your shared google drive as a destination, this feature is only available for the PRO plan. Find out more about how to upload to a shared drive here.
Step 3: Configure additional options
After you set the "General" settings you can set additional parameters. This step is not necessary and can be skipped.

Ask for a name and email before upload - This feature will ensure that before each upload your customer will be asked to fill in their name and email, these details will then be sent to you in a notification email.
Send me an notification after upload - If you leave this feature enabled, every file upload using the current uploader will be notified to your email.
Create a subfolders with a timestamps for each upload - This feature can help you a lot with organizing your files on Google Drive, inside the destination folder selected in the second step, a folder will be nested after each upload, which will be named according to the current date and time.
Language - Set language of the uploader. By default, the uploader translates to the language set in the user's browser.
Quantity - Select whether only one file can be uploaded at a time using the uploader or multiple files can be uploaded.
Upload size - Select "Any size" if you do not want to limit the size of uploaded files. Use "Less than" to select the maximum size of files that can be uploaded, useful for example to save space on Google Drive.
File types - Set the specific data types that can be uploaded, there are several preset options to choose from or you can create your own list of allowed types.
After setting all parameters, don't forget to save all changes!
TIP: On the next page you can also create your own form before uploading. You can learn more about the form here.
Step 4: Work with an uploader
You will immediately see the newly created uploader in the list of uploaders. You can delete the uploader, edit it - it opens the settings used in steps 2 and 3, or duplicate it - it creates an exact copy of the current uploader, which you can then edit to suit your needs.

Under the uploader you have the possibility to monitor the uploader usage statistics and use the "in your Drive" button which opens in a new window the selected folder where you have stored all uploaded files.
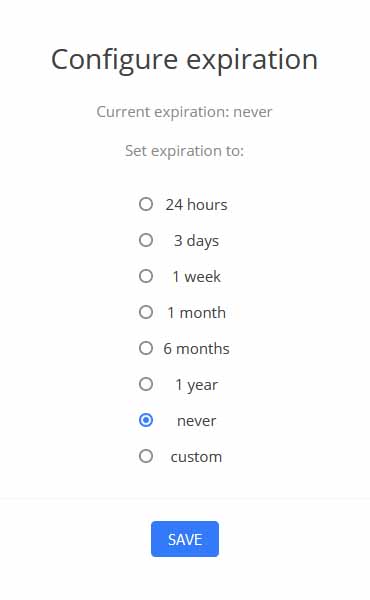
Using the "Configure expiration" button, you can set how long a given retiree will be active. If you want to use the uploader for a long time, select the "Never" option. On the other hand, you want to limit when files can be uploaded, for example as answers to a school test, select from the preset values or create your own "Custom" value.
Please note that expiration settings are only available for the PLUS and PRO plans.
Step 5: Share your uploader
Once you have the uploader created and set up you can start using it right away. Clicking on the name of the uploader in the list of uploaders will open the page below.

Here you can share the uploader and start using it with your customers. Just copy the link and send it to your customers.
If you have a PLUS plan or higher you can embed the uploader on your page using iFrame. You can learn more about embedding here.
If you have a PRO plan you can also use the JavaScript API. You can learn more about the API here.